环境准备
conda create -n stable-diffusion python=3.10.6
conda activate stable-diffusion
conda install pytorch==2.0.1 torchvision==0.15.2 torchaudio==2.0.2 pytorch-cuda=11.8 -c pytorch -c nvidia
安装webui
- 克隆代码
git clone https://github.com/AUTOMATIC1111/stable-diffusion-webui.git cd stable-diffusion-webui - 安装依赖
注意不要使用webui.sh直接安装,会失败pip install -r requirements_versions.txt -i https://pypi.doubanio.com/simple/ conda install gdown==5.1.0 conda install beautifulsoup4==4.12.3 - 下载checkpoint
地址:
https://huggingface.co/runwayml/stable-diffusion-v1-5/resolve/main/v1-5-pruned-emaonly.safetensors
下载后放到目录:./models/Stable-diffusion/
启动
python launch.py如出现以下错误
OSError: Can't load tokenizer for 'openai/clip-vit-large-patch14'. If you were trying to load it from 'https://huggingface.co/models', make sure you don't have a local directory with the same name. Otherwise, make sure 'openai/clip-vit-large-patch14' is the correct path to a directory containing all relevant files for a CLIPTokenizer tokenizer.则需要手动下载openai/clip-vit-large-patch14
下载地址:https://huggingface.co/openai/clip-vit-large-patch14
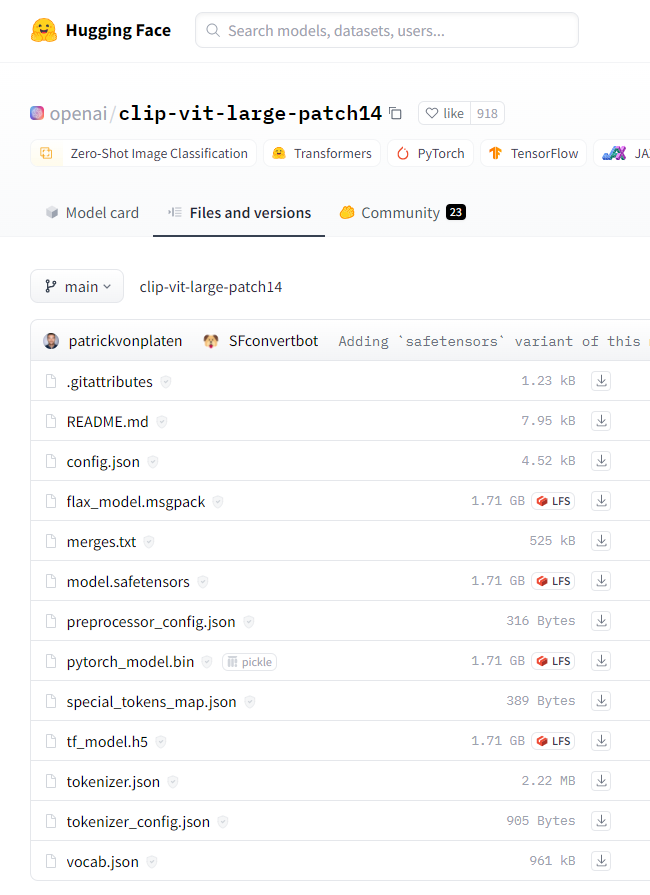
可以将这边的所有文件下载下来,放到一个目录中,假设目录的绝对路径为/home/nyy/.cache/huggingface/hub/models--openai--clip-vit-large-patch14
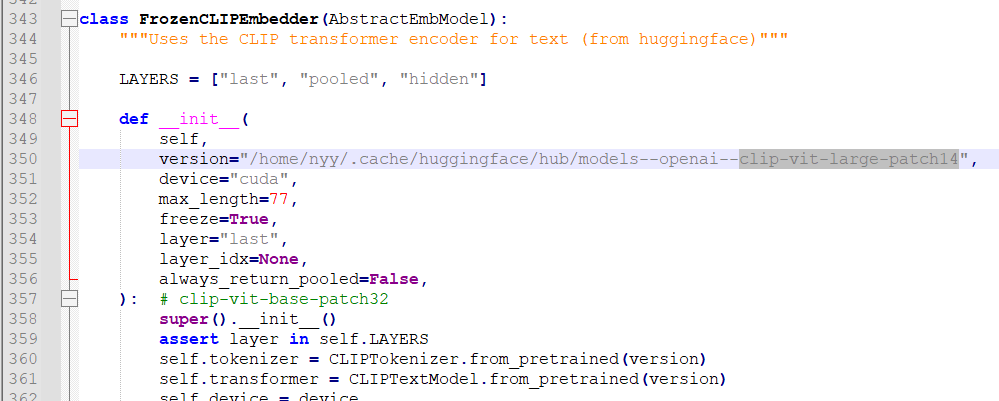
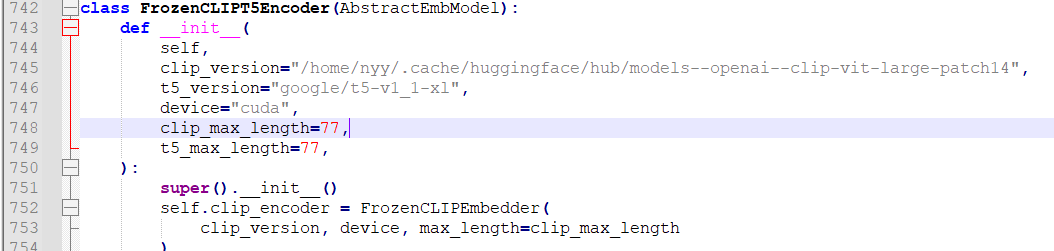
然后需修改两个文件,如下
./repositories/generative-models/sgm/modules/encoders/modules.py
./repositories/stable-diffusion-stability-ai/ldm/modules/encoders/modules.py中还有两处将openai/clip-vit-large-patch14修改为上面下载的路径,这里为/home/nyy/.cache/huggingface/hub/models--openai--clip-vit-large-patch14
每个文件中有两处,总共修改四处
汉化
- 下载汉化包
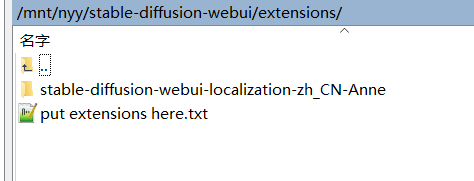
git clone https://github.com/dtlnor/stable-diffusion-webui-localization-zh_CN.git - 将汉化包放入
extensions目录

- 重启webUI以确保扩展已经加载了
- 在
Settings选项卡,点击 页面右上角的 橙色Reload UI按钮 刷新扩展列表

- 在
Extensions选项卡,确定已勾选本扩展☑️;如未勾选,勾选后点击橙色按钮启用本扩展。

- 在
Settings选项卡中,修改语言选项

- 然后按一下 页面顶部左边的 橙色
Apply settings按钮 保存设置,再按 右边的 橙色Reload UI按钮 重启webUI